Thursday, 24 March 2011

11 DHCP

The final installment in my assessment. Install DHCP, create a scope and a reservation for your Windows 7 computer. Ensure that the DHCP server is pointing it’s clients to the DNS server running on the Domain Controller and that the DNS server has a forwarder enabled.

Firstly, to install a new role. In the server manager, click roles in the left pane, and click add roles in the right pane.


Select DHCP Server from the list of roles and click next.


The introduction page is good in the way it helps you better understand the role and makes a couple of suggestions of things to do after you've installed.


The first DHCP configuration page allows you to select which networks DHCP will use to service clients. Click next.


Next fill in the domain name, clients will use this for name resolution. also fill in the IPv4 address of the DNS server. Click next.


We do not configure WINS as part of our assessment so i chose to disable it. Click next.


Here is the chance to create a DHCP Scope, this is part of my assessment however it will be covered later. Click next.


We are not using IPv6 so i left it disabled. Click next.


To authorize the DHCP server in Domain services, i chose to use my current credentials. Too many passwords gets hard. Click next.


The summary window shows all the configurations you have chosen, make sure they are correct and click install.


The installation progress can take some time, so don't get worried if the installation bar stops. It will start moving again.


Once its finished installing you should get the green tick of approval, stating that the installation succeeded. Click close.


To create a DHCP scope go to start > administrative tools > DHCP. Open the domain and right click IPv4 and click new scope.


The DHCP scope wizard starts. Click next.


Give the scope a name, and if you desire, a description.


You need to fill in the start and end ip address of the scope. Depending on what class address you enter, the subnet information automatically fills itself in. You can change this if you used a different subnet mask. Click next.


You can add ip addresses to be excluded from being leased. The address i have entered is the IPv4 address of the server. Click next.


Read the description about the lease duration and decide how long a lease will take to expire. Click next.


You can choose to configure other options regarding default gateways, DNS servers etc. I configured these in the above steps so I chose no and clicked next.


Activated the scope and clicked next.


Thus completing the scope setup. Next i have to set up a reservation. Click finish.


As the information says in the right pane, a reservation ensures that DHCP client is always assigned the same IP address.
Right Click reservations and click new reservation.


The new reservation window pops up and all you have to do is fill out the information. Make the reservation name relevant to its purpose so its easy to find. You must enter the ip address and mac address. That tells the DHCP server to give that mac address, that ip address when it asks for it. Click add.


Once added the scope will show up under reservations in the IPv4 section of the domain.


Now the final step is to ensure that the DHCP server is pointing it’s clients to the DNS server running on the Domain Controller. This was automatically set up in the previous steps. To ensure that the DNS server has a forwarder enabled go to start > administrative tools > DNS. Right click the DNS server and go to properties.


Click the forwarders tab click edit.


You can add DNS forwarder to make searching the network faster. I made one up just as an example and clicked OK.


When you add a forwarder it will show up in forwarders properties. The root hints are the Servers that run the Internet, which is massive that's why these are only used as a last resort.


This concludes my blog on network infrastructure. I thank you for taking the time to read it, hope it was not too boring. I learnt alot about the way Server 2008 works and the options that can be changed in group policy for separate users, and/or computers, and for every user and/or computer. Also i learnt alot about DHCP and DNS and how scopes and reservations can make a network administrators life just a little easier.
Thank you
Leigh Hampshire.


Wednesday, 23 March 2011

10 Setting up the users directory

To create a users directory on the server, go to the base c:, create a new folder called UserDir.


Next the folder has to be shared with all the users. Right click the folder and choose properties, click the sharing tab, and click share.


Pick which users and/or groups to share with, add if necessary.


Next i had to edit the user profiles to map to their own
directory in usersdir.


Open up Active Directory Users and Computers, Start > Administrative tools > Active Directory Users and Computers. Find one of the users, right click and go to properties.


Under the profile tab in the home folder section select the connect option and select a drive letter and then fill out \\leighdc\usersdir\username.  When you click apply the button the word username automatically turns into the name of the user who's properties you are changing.


When all is said and done, in the usersdir appears a folder for each user that will appear to them as a hard drive.


To direct the my documents folder to the users home directory, go back into the group policy manager, start > administrative tools > group policy manager. edit the policy for each OU. Navigate to documents under user configuration, and go into its properties.


You can choose to direct the documents folder to the users home directory which i created previously.


Once the OK button is pressed the my documents folder will be on the users H:.


9 Set up Group policies.

The first step of setting up Group Policies, was to enable auditing on log on events. So, in the policy editor for the default domain policy, i had to locate the Audit account log on events. Once found, right click and go to properties.


In the properties window I had to select define and i audited for both success and failure. So i will know every time someone attempts to log onto my domain.


Also audited log on events....


And privilege use.


As you can see all the items being audited say so under the policy setting title in the right pane.


The next step was to setup a different proxy server for each OU. Initially this was difficult for me because i didn't understand it, but after about the 10th time of being explained to me i finally clicked. Thanks Bob.

In the group policy manager, right click and edit the group policy for whichever OU is to be changed.


Next I had to find the proxy settings under user configuration. Once found, I right clicked and went into properties.


I then made up my own pretend proxy just to show that this particular OU had a different one to all the others. Once the proxy address and port number have been entered click OK.


The proxy for HR has now been set to "this".
I set the proxy for Marketing to "did".
I set the proxy for Research to "my".
I set the proxy for sales to "head.in".

The next step was to disable the use of the display settings by the user.
To do this i had to find the display settings in the policy editor, then right click and edit the disable the display control panel.


Then all i had to do was simply click enable which actually disables, then click OK


Next Step was to setup up different favorites in Internet explorer for each OU. Firstly, edit the group policy of a particular OU, then locate URLs under user configuration. Right click Favorites and Links, and go to properties.


Next click add URL...


Type in the name of the site, followed by the actual URL Address, then its up to you whether or not to assign an icon. when finished click OK.


Once added, the name of the site and its URL will appear under favorites.
When the user signs in and open Internet explorer, in the favorites will be Google.


Setting a different home page for an OU is similar to setting up favorites. In fact, just underneath the favorites and links policy, is the Important URLs. Right click and go to properties.


Type in whatever the home page is to be for the particular OU, in the home page URL section. Once filled out click OK.


See, easy. Now when a user of that OU logs in and open Internet Explorer the home page will be yahoo.com.au.

Next step was to set the title bar for Internet Explorer. I navigated to the Browser User Interface, and entered the properties of the browser title.


Next i checked the customize title bars box and filled in my own title for the title bar, and clicked OK. Now when the user opens Internet explorer, the title bar will read "welcome to the Internet". 


The next thing on the agenda was to set up a log off script on a particular OU.
I chose to simply open a notepad when the user logs off. First i had to make the script.


Navigate to the scripts log off policy, under user configuration, right click and go to properties.


Click add to select which script to add.


If the script name is known then just type it in, if not you can browse for it.


If you decide to browse for it then navigate to where the script is, select it, then click open.


Once open the full path of the script will appear in the name window. When OK is clicked the script is set to automatically execute when the user issues the log off signal, which instead of logging off straight away, will open a new text document. Once the text document is closed the computer will then log off the user.


The next group policy config we had to carry out was to set up a message for users logging on, a welcome, or a warning.

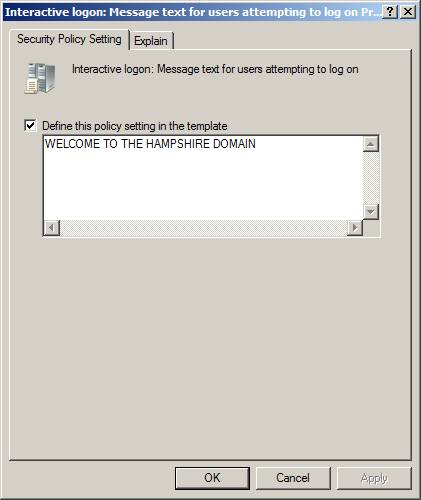
Navigate to the security options under computer configuration. Down the right hand pane look for Interactive log on: message text for users attempting to log on. Right click this and go to properties.


Check the box to define the policy and enter the message you want displayed.
When finished click OK and the next time the user logs in the message will appear.